Firing up a WebDriver in a JUnit test
There are plenty of good examples of how to fire up a Java WebDriver out there and one I often referenced is toolsqa.com. This, like many others, starts off by describing the processes using standard java main() methods. I want to write tests, not applications, so my goal here is to start straight away writing tests in a test framework so that I can view the results visually in an IDE.
My hope is to achieve this using JUnit 5 which is very close to being released, at the moment at Release Candidate 2. I want to use gradle as my build tool and I’ll be using Intellij IDEA free community edition as my IDE. This post is intended to document the process from the very start so off we go:
Project setup
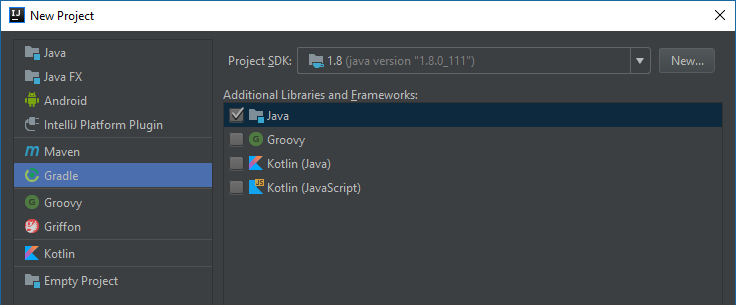
With JDK 8 and Intellij IDEA installed I’ll take a couple of minutes to walk through starting up a gradle project for this:
Create a new project
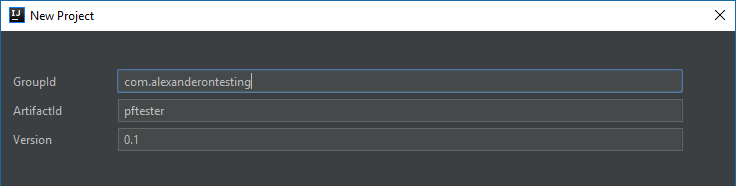
Name your project
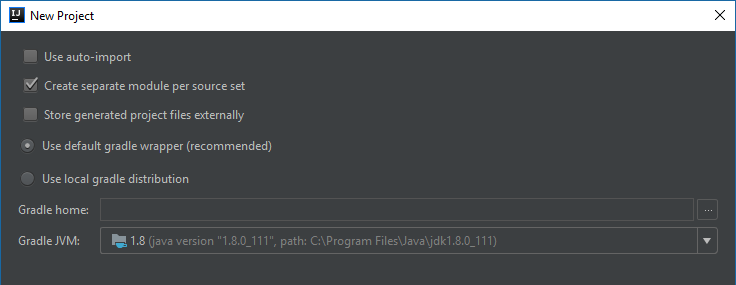
Select the default gradle options
And choose the project location

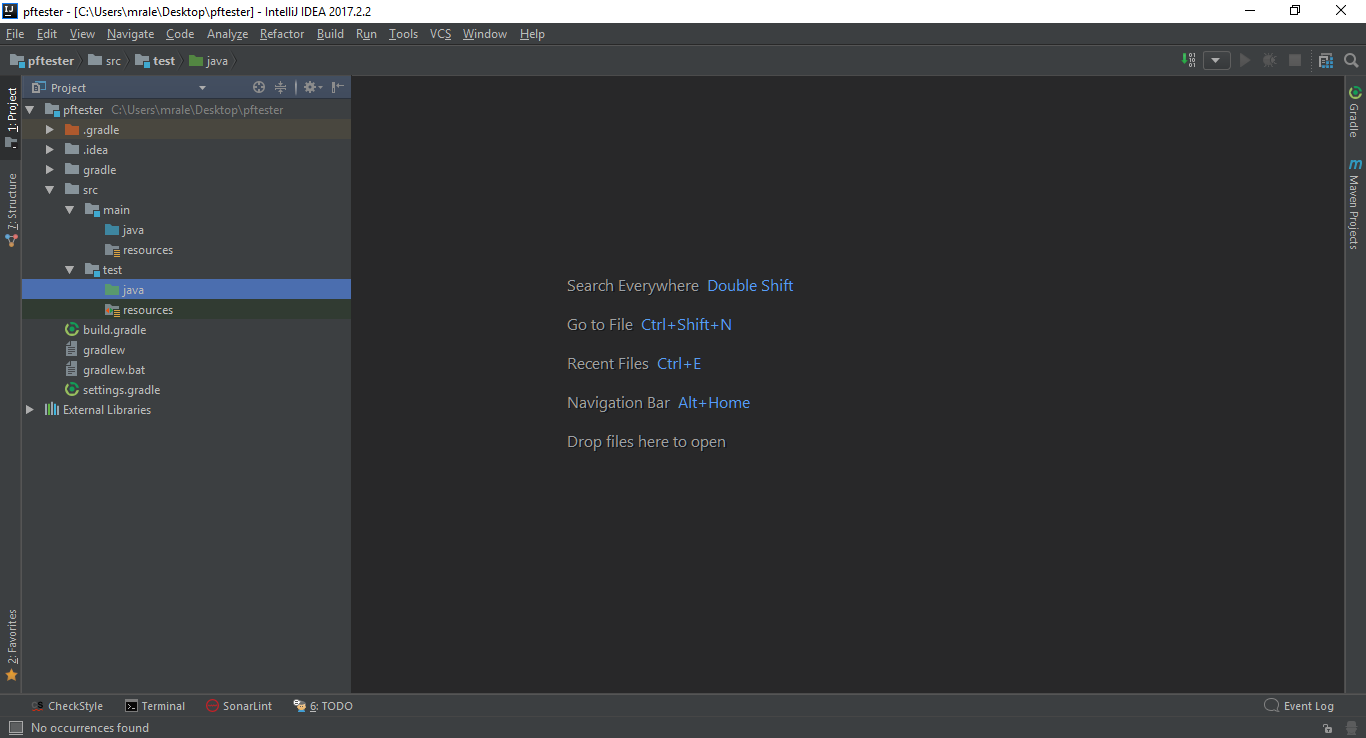
You will need to give Intellij IDEA a few minutes to get everything ready, but then you will be greeted with something like this
Gradle setup
Explaining the gradle setup is rather beyond the scope of this blog, so to get you started, replace line 4 onwards in the build.gradle that has been created for you:
buildscript {
    repositories {
        mavenCentral()
    }
    dependencies {
        classpath 'org.junit.platform:junit-platform-gradle-plugin:1.0.0-RC2'
    }
}

apply plugin: 'org.junit.platform.gradle.plugin'

junitPlatform {
    platformVersion '1.0.0-RC2'
    reportsDir file('build/test-results/junit-platform')
    //enableStandardTestTask true
}

apply plugin: 'java'

sourceCompatibility = 1.8

repositories {
    mavenCentral()
}

dependencies {
    compile group: 'org.seleniumhq.selenium', name: 'selenium-java', version: '3.5.1'

    testCompile group: 'junit', name: 'junit', version: '4.12'
    testCompile group: 'org.junit.jupiter', name: 'junit-jupiter-api', version: '5.0.0-RC2'
    testCompile group: 'org.junit.platform', name: 'junit-platform-launcher', version: '1.0.0-RC2'
    testRuntime group: 'org.junit.jupiter', name: 'junit-jupiter-engine', version: '5.0.0-RC2'
    testRuntime group: 'org.junit.vintage', name: 'junit-vintage-engine', version: '4.12.0-RC2'
}
Obviously we should be able to replace the JUnit RC2s once it reaches GA and this should enable us to run either JUnit 5 OR JUnit 4 tests from within Intellij IDEA.
You will be prompted to import the gradle project. Accept, and let it finish getting things ready.
ChromeDriver
I’m going to start out by firing up a ChromeDriver to control the Google Chrome browser (so please install it now if you haven’t already – I’ll get to other browsers in a future post.) To do this you will need the ChromeDriver executable which can be downloaded from https://sites.google.com/a/chromium.org/chromedriver/downloads
Download the version for your platform and copy it into either resources folder in your project. I’m working on Windows 10 so it’s ChromeDriver.exe for me.
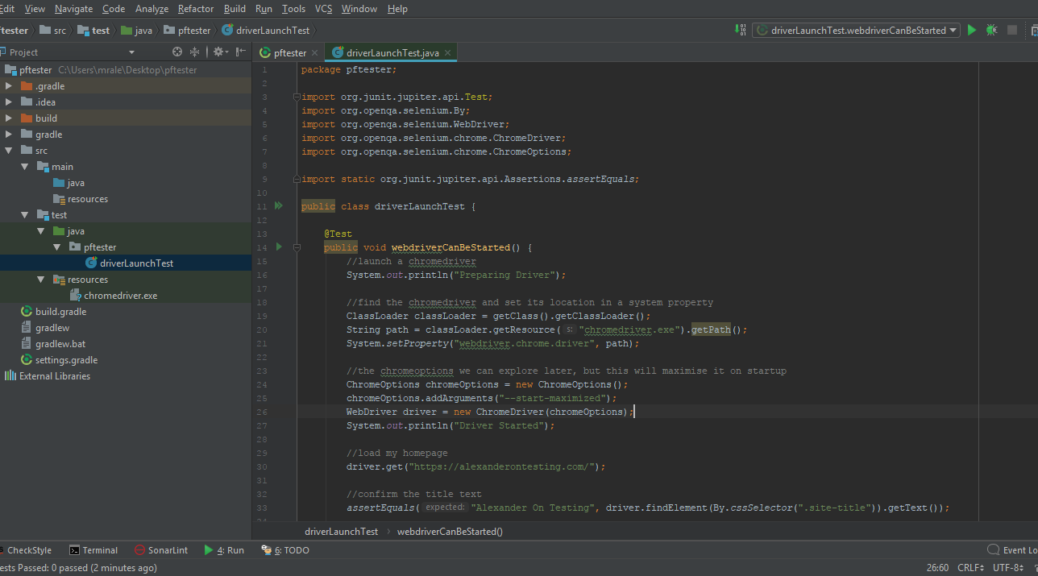
Our first test
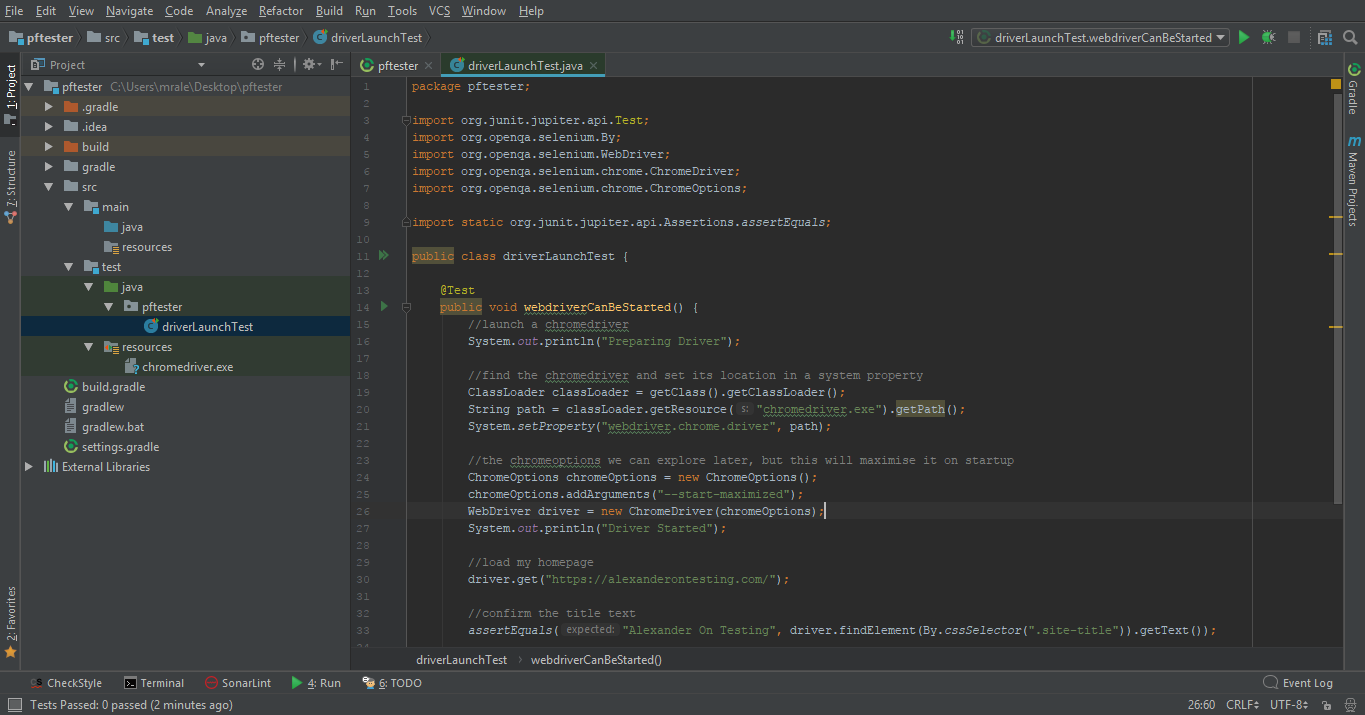
Finally we are ready for our first java code so lets create a test class called driverLaunchTest. I’ll create it in a package called pftester and here is the code to get you started.
package pftester;

import org.junit.jupiter.api.Test;
import org.openqa.selenium.By;
import org.openqa.selenium.WebDriver;
import org.openqa.selenium.chrome.ChromeDriver;
import org.openqa.selenium.chrome.ChromeOptions;

import static org.junit.jupiter.api.Assertions.assertEquals;

public class driverLaunchTest {

    @Test
    public void webdriverCanBeStarted() {
        //launch a chromedriver
        System.out.println("Preparing Driver");

        //find the chromedriver and set its location in a system property
        ClassLoader classLoader = getClass().getClassLoader();
        String path = classLoader.getResource("chromedriver.exe").getPath();
        System.setProperty("webdriver.chrome.driver", path);

        //the chromeoptions we can explore later, but this will maximise it on startup
        ChromeOptions chromeOptions = new ChromeOptions();
        chromeOptions.addArguments("--start-maximized");
        WebDriver driver = new ChromeDriver(chromeOptions);
        System.out.println("Driver Started");

        //load my homepage
        driver.get("https://alexanderontesting.com/");

        //confirm the title text
        assertEquals("Alexander On Testing", driver.findElement(By.cssSelector(".site-title")).getText());

        //close the webdriver
        driver.quit();
    }

}
Note: assuming you have imported the gradle project there should be no errors and you will something like this:
Running our first test
The small green arrow at the start of the test method allows us to run the test, and the double arrow runs all tests in the class. So lets see what happens..
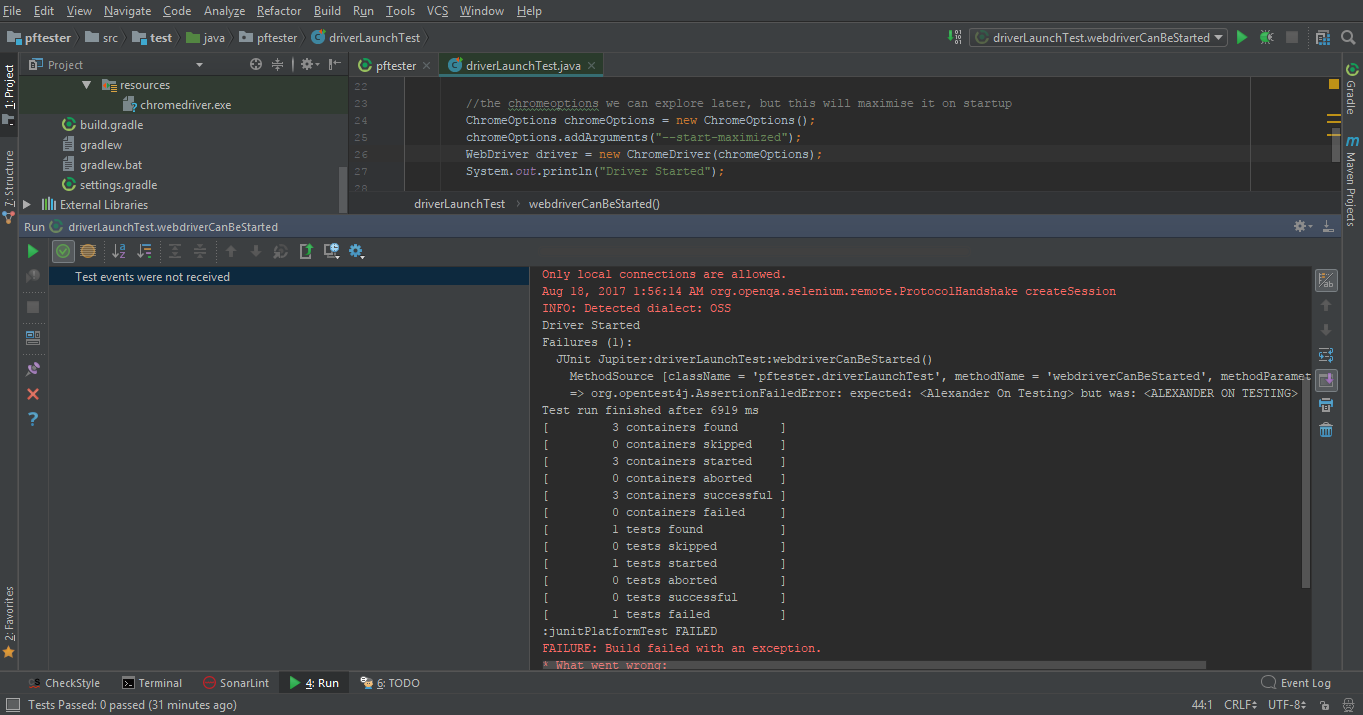
Firstly, instead of the nice coloured traffic lights in the IDE to tell me what has happened, I just get ‘Test events were not received’ although as we saw the browser open the test must have run, but in fact failed so badly that the browser didn’t close. On investigation, it seems that JUnit 5 tests can only be run using the gradle plugin we added earlier. Unfortunately, the results of this are not reported by the IDE and we can only read the results in the text output.
This is not good for something intended to be an easy starter, so I guess I will have to revert to running JUnit 4 tests until the Intellij IDEA and gradle support is fully in place. I’ll try to keep full JUnit 5 support in place however so, back in build.gradle, comment out or remove the following lines:
buildscript {
    repositories {
        mavenCentral()
    }
    dependencies {
        classpath 'org.junit.platform:junit-platform-gradle-plugin:1.0.0-RC2'
    }
}

apply plugin: 'org.junit.platform.gradle.plugin'

junitPlatform {
    platformVersion '1.0.0-RC2'
    reportsDir file('build/test-results/junit-platform')
    //enableStandardTestTask true
}
That leaves the much shorter:
group 'com.alexanderontesting'
version '0.1'

apply plugin: 'java'

sourceCompatibility = 1.8

repositories {
    mavenCentral()
}

dependencies {
    compile group: 'org.seleniumhq.selenium', name: 'selenium-java', version: '3.5.1'

    testCompile group: 'junit', name: 'junit', version: '4.12'
    testCompile group: 'org.junit.jupiter', name: 'junit-jupiter-api', version: '5.0.0-RC2'
    testCompile group: 'org.junit.platform', name: 'junit-platform-launcher', version: '1.0.0-RC2'
    testRuntime group: 'org.junit.jupiter', name: 'junit-jupiter-engine', version: '5.0.0-RC2'
    testRuntime group: 'org.junit.vintage', name: 'junit-vintage-engine', version: '4.12.0-RC2'
}
Back in our test class we will also have to remove the JUnit 5 import
import org.junit.jupiter.api.Test;
and replace it with
import org.junit.Test;
to get us running as a JUnit 4 test. Looking at the report in the console, we can see that the test failed due to the assert:
Driver Started
Failures (1):
JUnit Jupiter:driverLaunchTest:webdriverCanBeStarted()
MethodSource [className = ‘pftester.driverLaunchTest’, methodName = ‘webdriverCanBeStarted’, methodParameterTypes = ”]
=> org.opentest4j.AssertionFailedError: expected: <Alexander On Testing> but was: <ALEXANDER ON TESTING>
Test run finished after 6919 ms
At this point, the test stopped, but it failed to shutdown the browser and also leaves a ChromeDriver.exe process running that we have to kill manually. This is clearly not good enough!
I’ll fix the assertion next time, but for now lets make sure that the test is properly set up and torn down, even when there is a failure. To do this we need to use the @Before(JUnit4)/@BeforeEach(JUnit5) notation to create a method that runs at the start of each test to open a WebDriver and browser window. More importantly the @After/@AfterEach annotated teardown() method ensures that the WebDriver and browser are closed even when a test fails. I can use both JUnit 4 and JUnit 5 annotations so that just changing import between org.junit.Test and org.junit.jupiter.api.test would switch between the versions if gradle/IDEA supported it.
So to get it working with JUnit 4 that means:
package pftester;

import org.junit.After;
import org.junit.Before;
import org.junit.Test;
import org.junit.jupiter.api.AfterEach;
import org.junit.jupiter.api.BeforeEach;
import org.openqa.selenium.By;
import org.openqa.selenium.WebDriver;
import org.openqa.selenium.chrome.ChromeDriver;
import org.openqa.selenium.chrome.ChromeOptions;

import static org.junit.jupiter.api.Assertions.assertEquals;

public class driverLaunchTest {
    private WebDriver driver;

    @Before
    @BeforeEach
    public void setup() {

        //launch a chromedriver
        System.out.println("Preparing Driver");

        //find the chromedriver and set its location in a system property
        ClassLoader classLoader = getClass().getClassLoader();
        String path = classLoader.getResource("chromedriver.exe").getPath();
        System.setProperty("webdriver.chrome.driver", path);

        //the chromeoptions we can explore later, but this will maximise it on startup
        ChromeOptions chromeOptions = new ChromeOptions();
        chromeOptions.addArguments("--start-maximized");
        driver = new ChromeDriver(chromeOptions);
        System.out.println("Driver Started");
    }

    @Test
    public void webdriverCanBeStarted() {

        //load my homepage
        driver.get("https://alexanderontesting.com/");

        //confirm the title text is correct
        assertEquals("Alexander On Testing", driver.findElement(By.cssSelector(".site-title")).getText());

    }

    @After
    @AfterEach
    public void teardown() {

        //close the webdriver
        driver.quit();
    }
}
Running the test now still fails the assert, but at least it cleans up after itself and clearly reports itself in the IDE.
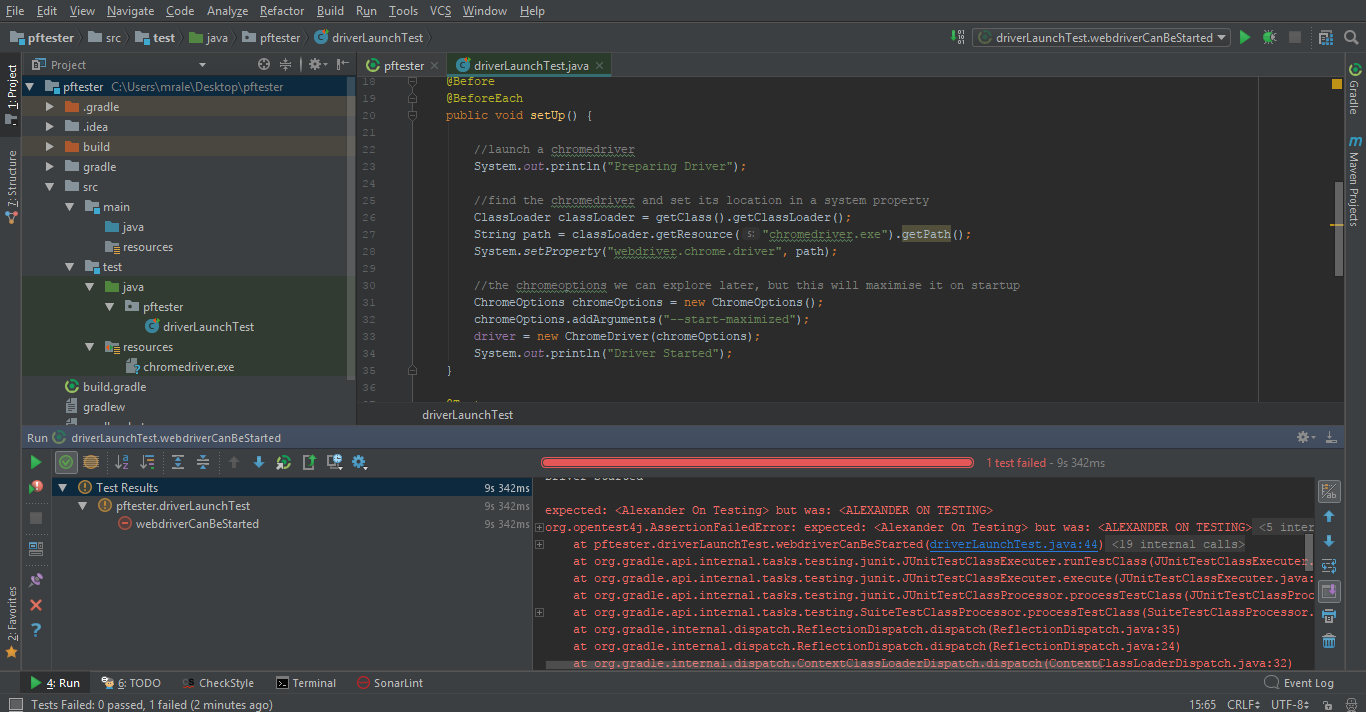
We can also now use links in the stack trace to help in debugging. We will look at what’s going wrong with the assert next time.
Progress made this week:
- Build out a simple web test in intellij IDEA using selenium 3.5.1 gradle and JUnit 5/4
- Running JUnit 5 tests using the gradle junit-platform-gradle-plugin
- Running JUnit 4 tests from the IDE and reporting the results in a friendly format
- Using setUp() and tearDown() methods to ensure that the WebDriver closes properly after test failure
Lessons learnt:
- JUnit 5 support is not yet where I would like it to be to achieve my goals
- Selenium WebDriver returns the text capitalised as viewed on the page not in the HTML
- JUnit 5 asserts are not as flexible with Strings as I would like